Snickerdoodle Blondies

Photobucket

Pillsbury is accepting entries for their March 2012 Bake-off NOW!  Are you entering your favorite recipe?  The prizes are incredible, so you probably should!  How does 1st place – $1 million + $10,000 in GE Kitchen appliances sound?  And several $5,000 + $3,000 in GE appliances prizes?  Read more HERE.  100 finalists will go to Orlando to face off!  I know I’m devoting some of my spring break time to baking up and testing recipes!  


But for now I have another delicious recipe to share with you.  This one is not mine, it comes from one of my new fave blogs Bakergirl.  I’ve seen several Snickerdoodle Blondie recipes floating around the food blogger world for quite some time and have had many of them bookmarked for what seems like forever.  But some strange reason I’ve never made them.  It really is strange because we LOVE blondies and we LOVE all things cinnamon sugar here.  Just like the matcha shortbread cookies I kept pushing off and finally got around to baking, these Snickerdoodle Blondies were finally at the top of my To-Do list.  And thank goodness for that because these are absolutely perfect.  Soft and chewy on the inside, cinnamon-sugary crunch on top.  The most amazing combination of a snickerdoodle cookie and a vanilla blondie one could possibly imagine.  I’m saying all this and I haven’t even tried one warm with vanilla ice cream on top yet!  These babies are a winner.  Don’t forget to see our printable recipe card below!  Click the recipe card to open a larger printable version.  

Photobucket

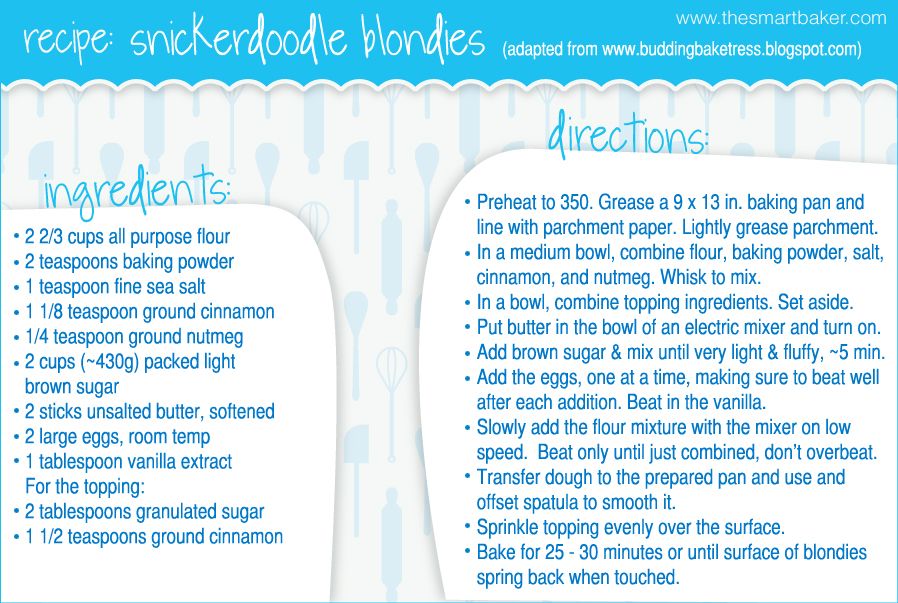
Snickerdoodle Blondies adapted slightly from Bakergirl
Ingredients:
2 2/3 cups all purpose flour
2 teaspoons baking powder
1 teaspoon fine sea salt
1 1/8 teaspoon ground cinnamon
1/4 teaspoon ground nutmeg
2 cups packed light brown sugar (approximately 430 grams)
2 sticks unsalted butter, softened
2 large eggs, room temp
1 Tablespoon vanilla extract
For the topping:
2 Tablespoon granulated sugar
1 1/2 teaspoon ground cinnamon


Directions:
Preheat to 350 F.  Grease a 9 x 13 inch baking pan and line with parchment paper.  Lightly grease the parchment.
In a medium bowl, whisk together the flour, baking powder, sea salt, cinnamon and nutmeg.
In a small bowl, combine the topping ingredients and set aside.
Put butter in the bowl of an electric mixer and turn on.  When butter has been beaten a bit, add in the brown sugar and mix until very light and fluffy, about 5 minutes.
Add the eggs in one at a time, making sure to beat well after each addition, wiping down sides of bowl with a rubber spatula if necessary.  Add in the vanilla and beat.
Slowly add the flour mixture with the mixer on low speed.  Beat just until combined, do not overbeat.
Transfer batter to the prepared pan.  Use offset spatula to smooth it.
Sprinkle the cinnamon sugar topping evenly over the surface.
Bake for 25 – 30 minutes or until surface of blondies spring back when touched.
Allow to cool on a wire rack and enjoy!


Photobucket


Printable recipe card!
Photobucket

Posted in Blondies | Tagged , , | Leave a comment

My Wedding Cupcake Tower!

Photobucket


I wanted to share photos of my wedding “cake” with you all!  If you are reading this blog, you’re likely as obsessed with desserts as I am, so I know you’ll appreciate these. 🙂  And no, I did not wind up making my own cupcakes – as many people warned me not too!  I think it was a very wise decision.  The cupcake tower structure that the cupcakes are sitting on are our latest product on www.TheSmartBaker.com.  It worked wonderfully at the wedding!  We used it in our candy buffet, too for our hand-dipped chocolate covered items.  Yum!  Take a peek!!

Photobucket

Photobucket
My cake topper!  Yep, thats my pup on it, too 🙂

Photobucket

Photobucket
Here is the tower for the candy buffet.  We had around 40 pounds of other candy, too – like sour watermelons, chocolate covered pretzels, yogurt pretzels, chocolate covered gummy bears, neon sour worms, mini gummy bears, jelly rings, sour belts, and peachy penguins.  Guests got to take home a box full of candy!  We got all of our candy from www.AJsCandyCastle.com


Posted in Cupcakes | Tagged , , , | Leave a comment

Ginger Custard Pumpkin Pie

Photobucket


This weekend it began to feel like Fall in Florida.  Up until now, it was still a consistent high 80’s – 90’s.  But Friday morning started off chilly and it has been long-sleeves weather ever since.  It is definitely a nice change!  And what better way to make it feel extra Fall-ish than to make a Pumpkin Pie.   Continue reading

Posted in Uncategorized | Tagged , , , | Leave a comment

Pink Ribbon Brownies

Photobucket
For our engagement party, we received a Cricut Cake!!!  If you are familiar with the Cricut machines for paper, it basically is a little plotter that allows you to cut out any shape you want.  The Cake version can cut sheets of frosting, fondant and gum paste and makes fancy cake decorating 900 million times easier.  We finally got to use our new machine when we made Brownies to be sold to benefit Making Strides Against Breast Cancer.
Photobucket
I made a small amount of Pink Fondant, rolled it out and placed it on the carrier sheet. We bought software for the computer that allows you to cut any shape you can create, so on the computer screen at the left, you can see the Cancer Ribbon shape we made (ok, the Ribbon shape that Daniel made).

Photobucket
After the machine cuts it, you just peel off the extra and your design is left on the carrier.  Since it was very soft, I allowed it to air dry for a few minutes to firm up enough to handle it.

Photobucket
Photobucket
The 9×13 sheet of brownies we made was sliced into nice big squares.

Photobucket
Then we carefully lifted the fondant ribbon off of the carrier.  I made a small batch of Simple Syrup, and painted a small amount of this on to the back of the Fondant Ribbon, and then placed it on the brownies.  The simple syrup acts like a glue and holds your design in place.

Photobucket

The proceeds from the sale of these brownies went to benefit the American Cancer Society.  Have you participated in any Charity Bake Sales this year?
Posted in Brownies, Dessert | Tagged , , , | Leave a comment

Roasted Cashew Brittle

Photobucket

This week, it’s my turn to host Sweet Melissa Sundays!  Last time I hosted it was August 2, 2009 so I was so excited to finally host again.  We have been baking along to the Sweet Melissa Baking Book since April of 2009, so a good deal of the recipes from the book have already been selected and baked.  We’ve made so many delicious things over the past year and a half! Can you believe we’ve been doing this that long already?

For the recipe this week, I selected the Roasted Cashew Brittle.  I’ve never made brittle before and I love cashews so I thought this would be a fun recipe.  I prepared the recipe word for word from the Sweet Melissa Baking Book, no substitutions or changes.  I’m hosting, so I didn’t want to mess anything up! It was actually a rather quick and easy process.

I’ve only tasted commercially prepared brittle before so I didn’t really know what to expect of the homemade kind.  I’m not sure if mine came out like it was supposed to… some pieces were soooo chewy, particularly the less nutty – more caramelly ones, that they were absolutely UN-chewable and I wound up having to spit them out!  The pieces with more nuts were crunchier (obviously) and edible – and quite good!!!  Did anyone else have this, or know what caused this?  I noticed that Melissa mentions you can also chopped it into fine chunks or grind it into a praline to sprinkle on top of ice cream.  I think I might try this since the au natural variety is a bit rip-your-fillings-out chewy.  If I were to make this again, I might increase the amount of nuts to increase the crunchy factor.

How did the recipe go for all of you?  I’m so curious to find out!


Photobucket
Waiting for the mixture to reach 348 F (such a high temp!)

Photobucket
Finally got to 348 degrees.  Notice the color of the mixture now!  Yum!

Photobucket
After baking soda has been added – it fizzles up!

Photobucket
Letting it cool in the pan.  So hard to leave it alone!

Photobucket
It took some serious banging to break it up… sorry neighbors!!!

Photobucket

Photobucket

Photobucket
This last picture is after it has sit in an airtight container for a few hours untouched… it became a solid chunk of brittle!  VERY sticky.  No wonder it is so hard to chew!


Melissa’s Roasted Cashew Brittle
Makes about 2 pounds of brittle

Ingredients:
1 1/2 teaspoons baking soda, sifted
1/4 teaspoon kosher salt
1 cup light corn syrup
2 cups sugar
1/2 pound roasted cashews
1 teaspoon pure vanilla extract
1 stick unsalted butter at room temperature, cut into 1/2 inch pieces

Directions:
Lightly butter a jelly-roll pan or rimmed cookie sheet.
1. In a small bowl, whisk together baking soda and salt.
2. In a large saucepan over medium-high heat, stir together corn syrup and sugar and bring to a boil. When its boiling, cover for 3 minutes to melt any sugar crystals stuck on the sides of the pan and prevent crystallization).
3. Remove the cover and cook until it reaches 348 F on a candy thermometer.
4.  Remove from heat and stir in cashews. Stir in baking soda mixture.  BE CAREFUL – the mixture will bubble up and is really hot!  When the mixture starts to settle, stir in vanilla and butter briskly until it disappears.
5. Pour mixture into prepared pan. Spread evenly with a buttered spatula.  Let cool to room temperature.
6.When its completely cool, crack the brittle into irregular chunks by banging the pan flat on the counter.

Do not refrigerate or freeze. Brittle keeps in an airtight container at room temperature for up to three weeks.

Be sure to visit the Sweet Melissa Sundays page to see the other bakers who participated this week!  And check out the Sweet Melissa Baking Book for this recipe and all the others we’ve baked along the past year and a half!


Posted in Candy | Tagged , , | Leave a comment

Cookies on Demand


Photobucket

There are two reasons I’m calling these chocolate chip cookies “Cookies on Demand”.

1- The recipe doesn’t require softened butter.  So no waiting for butter to come to room temperature, you can use it straight out of the fridge.
2- I prepared the recipe, rolled the dough into balls and baked a few to have that night.  Then I froze the rest of the dough balls on a cookie sheet until they were hard, and placed them in airtight container where they stayed until I had a cookie craving.  Want a cookie?  Just grab two (because no one can eat just one fresh baked cookie) out of your freezer, pop it on a cookie sheet and bake it up.
These cookies have a nice sturdy, crispy exterior and a perfect chewy interior.  They don’t flatten out all the way while baking and have a little bit of thickness to them.  Pretty close to perfect if you ask me.
Cookies on Demand, adapted from The Ultimate Stand Mixer Chocolate Chip Cookie recipe
makes about 25-30 cookies
11.25 ounces all purpose flour (about 2.5 cups)
1 1/4 tsp baking soda
3/8 tsp fine sea salt
8 ounces unsalted butter, cold
1 cup firmly packed light brown sugar
3/4 c granulated sugar
2 large eggs
1 3/4 teaspoons pure vanilla extract
1/2 C white chocolate chips
1 C hershey’s dark chocolate chips
Preheat to 400 F. In a medium bowl, whisk together flour, baking soda and salt.
In the bowl of an electric mixer fitted with the paddle attachment, beat the cold butter.  Add both sugars and continue to beat for 4-5 minutes on medium.
In a separate bowl, mix eggs with vanilla.  Very slowly (over about 4-5 minutes) add this to the butter mixture.
Stir in the dry ingredients by hand.  Lastly add in the chocolate chips.
Shape the dough by the mounded tablespoon.
–If you are making them right away, place dough balls on a parchment or silpat lined cookie sheet and bake for about 6-9 minutes, or until edges are golden brown but still pale in the center.  Allow to sit on the cookie sheet for 5 minutes before removing to cool completely on the cooling rack.
–If you are making them to freeze them and have On Demand, lay out the dough balls on a parchment lined cookie sheet and place in the freezer until completely firm.  When hard, place in an airtight container until ready to bake.  If baked from frozen, bake at 400 F, but for 8-10 minutes.
Photobucket
Photobucket
Photobucket
Posted in Cookies | Tagged , | Leave a comment

Buttermilk Pound Cake

Photobucket

Desserts don’t always have to be elaborate or complicated.  Sometimes classics like a good vanilla pound cake are enough to make everyone happy.  Who doesn’t like pound cake?  This pound cake is just right – not too dry, not too moist; not too light, not too dense.  It’s right in between, and perfect when served with a scoop of your favorite ice cream on top.


Buttermilk Pound Cake adapted from Alton Brown
Ingredients:     *the measurements below are by weight, not volume
6 ounces unsalted butter, softened (+ more for greasing pan)
8 ounces* cake flour
8 ounces* sugar
2 large eggs, room temp
1/2 tsp vanilla extract
1/8 tsp almond extract (optional)
1/4 tsp fine sea salt
1/2 cup buttermilk, well shaken


Preheat to 375 F.  Grease a loaf pan with butter and coat in flour (I used a 9x5x3 loaf pan but a 8.5×4.5×2.5 would be ok).
In the bowl of an electric mixer, cream the butter and sugar together on medium until mixture is very fluffy and very light in color (about 6 minutes!).  With mixer on low, add eggs one at a time.  Mix for 1.5 minutes.  Add vanilla and salt and continue to beat for 30 seconds.
With mixer on low, add flour and buttermilk alternately, beginning and ending with flour.  After the last of the flour is added, beat for 30 seconds on medium.
Spread batter into the prepared loaf pan and smooth it out using a spatula. Bake for 35-40 minutes or until the crust is golden brown and a toothpick inserted into the center comes out clean.  Allow to cool in the pan on a rack for 10 minutes and then invert and remove from the pan to cool completely on a wire rack.


Photobucket


Photobucket

Posted in Cakes | Tagged , , | Leave a comment

Best Buttermilk Pancakes!

Photobucket


For last week’s Lemon Blueberry Buttermilk Pie, I bought the smallest size of buttermilk the grocery store had to offer, but I still had quite a bit leftover with nothing to do with it.  So what do you do when you have extra buttermilk on a Sunday morning?  Make buttermilk pancakes of course.  I used Aida Mollenkamp’s recipe for Cakey Buttermilk Pancakes and I think I’ve found a new favorite pancake recipe.  No other from scratch pancake recipe I’ve prepared has come out this good.  Plus, you can prepare it the night before, re-stir it in the morning and pour it on your hot griddle for ready-to-eat pancakes in minutes.  Sunday morning breakfast heaven.
This scaled down version made about 5 or 6 good sized pancakes, enough for two people.  For the full scale recipe, visit Food Network’s site here.

Favorite Buttermilk Pancakes adapted from Aida Mollenkamp


  • 5/8 C all purpose flour
  • 5/8 C well shaken buttermilk
  • 1/4 C melted unsalted butter (plus more for greasing the griddle)
  • 1 large egg, room temperature
  • 1 tablespoon granulated sugar
  • 1/2 teaspoon sea salt
  • 1/2 teaspoon baking soda
  • 1/2 teaspoon baking powder


In a medium bowl, whisk all ingredients together until combined and moistened thoroughly (some small lumps remaining are ok). Cover and store in the refrigerator to rest up to 12 hours before using. Right before using, stir briefly before using to loosen it up a bit – batter will have thickened up during rest time.
Heat a griddle over medium heat.  Melt 1 tablespoon butter on the griddle.  Being generous with the butter is what gives them their slightly crispy exterior.   Pour 1/4 cup batter for each pancake and cook until bubbles cover the top, about 3 minutes. Flip and cook until golden brown, another 1 minute. Repeat with remaining batter.  Serve immediately with maple syrup, powdered sugar, whipped cream, fresh fruit or anything else you can possibly think of.


Posted in Breakfast | Tagged , , | Leave a comment

Lemon Blueberry Buttermilk Pie

Photobucket

This week, Melissa of Lulu the Baker selected Lemon Blueberry Buttermilk Pie as the recipe for Sweet Melissa Sundays.  Thanks for picking this recipe, Melissa!  This was a fun one.  I don’t think I’d ever made a buttermilk pie before!


I prepared this recipe exactly as Melissa Murphy says in the Sweet Melissa Baking Book – no substitutions and alterations!  In fact, it was the first time I baked with actual buttermilk instead of substituting buttermilk powder. It was almost a success!  (and the buttermilk pancakes that were the result of having left over buttermilk were VERY much a success… I think I may have found a new favorite pancake recipe! More on that later!)   I simply decreased the amount of blueberries for the topping to 12 ounces because I thought 1.5 pints was a bit of overkill.  


Everything went very well, though there was a significant amount of clear liquid (butter maybe?) flowing out of the pie and onto the cookie sheet during the last minutes in the oven.  And I think the liquid made the crust a bit too soggy, because it wouldn’t come out of the pie plate!  It did wind up being quite a mess, but it was a DELICIOUS mess.  Everyone enjoyed it at dinner tonight!


Thanks for hosting, Melissa!  I liked this one quite a bit.  Go to Melissa’s blog Lulu the Baker for the recipe.  And be sure to visit the list of this week’s participants to see if the other bakers had a less messy experience than I did!

Posted in Pies | Tagged , , , | Leave a comment

Chocolate cake with Raspberry & Ganache filling

Photobucket
There is a sense of accomplishment when a completed cake makes it to the table.  I prepare the batter while the fiancee usually greases and flours the pans.  I keep a watchful eye on it in the oven and prepare the frostings and fillings while leveling the layers and applying the frosting is done by the boy (or else there is generally some screaming and crying going on from my end).  So cakes are a task we complete together.  After it is all done, the garnish is put on top and it is ready to be served, we’re both pretty proud to show off the finished product to the family.  The process is sometimes frustrating, usually messy and always fun.  So while cakes take a bit more time and effort than say, cookies or brownies, making a big fancy cake from start to finish every once and a while is a welcome request.
Last weekend we made this one and it received great reviews from everyone who tasted it.  It was a birthday cake for a friend who likes chocolate and raspberry.  I made a two layer moist chocolate cake, put a generous amount of red raspberry preserves and some rich chocolate ganache in the middle, and frosted the whole thing with vanilla buttercream.  I’d say it was a success.  If you have a chocolate raspberry lover in your life, you might want to make this cake for them.
Photobucket
Chocolate cake with Raspberry & Ganache filling
Chocolate cake, adapted from Cookie Madness
ingredients:
1 cup boiling water3/4 cup (75g) natural unsweetened cocoa2 cups (260g) all-purpose flour
3 Tablespoons buttermilk powder (in place of actual buttermilk)1 1/2 teaspoons baking soda3/4 teaspoon fine sea salt1 cup (200g) granulated sugar1 cup (240g) golden brown sugar1 cup (2 sticks) unsalted butter, room temp4 large eggs, room temp3/4 cup (6 ¼ oz) water, room temp (also in place of actual buttermilk)**2 teaspoons vanilla extract
directions:Preheat to 350 F or 325 F if using black cake pans. Grease and flour (2) 9 inch round pans and line with parchmentCombine boiling water and cocoa in a bowl and whisk until smooth. Set aside.In a medium bowl, sift together dry ingredients (flour, buttermilk powder**, baking soda, and salt). Set aside.  In a small bowl, lightly beat the eggs with the vanilla and set aside.In large bowl of an electric mixer, cream the butter and sugars together.  Beat in eggs/vanilla mixture.
Stir room temperature water** into cocoa mixture.  Add this cocoa mixture alternately with dry ingredients in 3 additions, beginning and ending with dry ingredients.Divide evenly between the two prepared pans.  Lightly spin the pans on a hard surface to distribute the batter.Bake 28-38 minutes (see note) or until a toothpick comes out barely clean. Cool and frost.
**If you happen to have buttermilk, which I never do, you can omit the buttermilk powder with the dry ingredients, and then use 3/4 (6 1/4 oz) of buttermilk instead of water called for at the end of the ingredients list.
Raspberry and Chocolate Ganache Fillings:
ingredients:
for raspberry layer:
10 ounce jar raspberry “spreadable fruit” (I used Smucker’s Simply 100% Fruit Seedless Red Raspberry Spreadable Fruit, but you could you could just use preserves also)
for ganache layer:
9 ounces bittersweet chocolate, chopped
1 1/8 cup heavy whipping cream
directions:
Place your leveled bottom cake layer on a cake plate.  Spread the red raspberry preserves onto this bottom layer to taste.  I used about 3/4 of the jar.
Place chopped chocolate in medium bowl. Bring heavy cream just to a boil in heavy medium saucepan.  Pour hot cream over the chocolate and let stand 1 minute, then stir until ganache is melted and smooth. Transfer ganache to medium bowl. Cover and refrigerate until ganache is thick enough to spread, stirring occasionally, for about 1 1/2 hours.  It should thicken to about the consistency of a heavy pudding and should not be runny.
Using an offset spatula, spread the ganache over the preserves, careful not to mix the two together too much – you want two separate layers.  Use as much ganache as you want – we probably used about 2/3 of the ganache recipe in this middle layer.  We froze the rest for later, but you could find other places to use it on this cake if you wanted.  For example, for some added chocolate, you could spread the remaining ganache on the top of the top layer and place the whole cake in the freezer for about 30 minutes until the ganache is set enough to be able to put buttercream frosting over it.
Vanilla Buttercream Frosting:
ingredients:
2 sticks unsalted butter, softened
4 c sifted confectioner’s sugar
2 tsp clear vanilla
pinch of sea salt
1/4 c milk, optional
Fresh raspberries and Raspberry preserves for garnish
directions:
Place butter in the bowl of an electric mixer and turn on the mixer.
Add all confectioners sugar and keep speed on low.
When all sugar is incorporated in, add vanilla and salt. Let mix for 5 min. If frosting is too stuff, add the milk by the tablespoon until the desired consistency is achieved.
To garnish:
After frosting, pipe a thin line around the edge of the top of the cake.  This will act as your glue to put the fresh raspberries on.  For extra raspberriness, spread a thin layer of preserves across the top of the cake, inside the ring of raspberries.  This will be easier to do after the cake has been refrigerated for a bit and the frosting is set.
Keep the cake in a cake dome in the refrigerator.  Remove from the fridge about 2 hours before serving.


Photobucket
Raspberry Preserves and Chocolate Ganache
Photobucket


Photobucket
Adding the garnish
Photobucket
Photobucket
Photobucket
Posted in Cakes | Tagged , , , | Leave a comment